Du lundi au samedi : de 9h00 à 19h00 Le dimanche est FERMÉ

Contents
- 1 Introduction
- 2 Planning Your Installation: Choosing the Dock Leveller
- 3 The Pre-Installation Safety & Site Checklist
- 4 Step-by-Step Dock Leveler Installation Guide
- 5 Cost Factors: Budgeting for Your Project
- 6 Conclusion: Elevating Your Operations from the Ground Up
- 7 FAQs
- 8 How do I ensure the leveler fits the leveler pit and meets specification?
- 9 What are common causes of equipment damage during dock leveler installation and how can I prevent them?
- 10 How do I install edge-of-dock levelers vs. levelers in the pit?
- 11 What maintenance and inspection steps should I perform after I install a dock leveler?
- 12 How do I adjust the leveler to the proper height and ensure smooth articulation for pallet jacks and forklifts?
Introduction
In modern logistics and warehousing operations, the loading dock leveler serves as the crucial node that connects internal storage with external transportation. Between the truck and the warehouse, gaps and height differences are inevitable. How to bridge this gap safely and efficiently directly impacts loading speed, cargo integrity, and operational continuity. This guide focuses on the cost considerations, type comparisons, and key safety protocols of dock leveler installation, helping you make informed investment decisions to boost your facility’s productivity.
Proper dock leveler installation is more than just attaching steel to concrete; it protects your forklifts, safeguards your personnel, and ensures a smooth flow of goods from transport to storage. However, poor planning or a misjudgment of your facility’s specific needs can lead to structural damage, equipment failure, and costly disruptions to your business operations.
Planning Your Installation: Choosing the Dock Leveller
Selecting the correct equipment is the most critical step before breaking ground. The choice between pit-style and edge-of-dock units will dictate your infrastructure requirements, while the drive system—hydraulic or mechanical—determines your long-term maintenance and electrical needs.
Pit-Style vs. Edge-of-Dock (EOD) Levelers
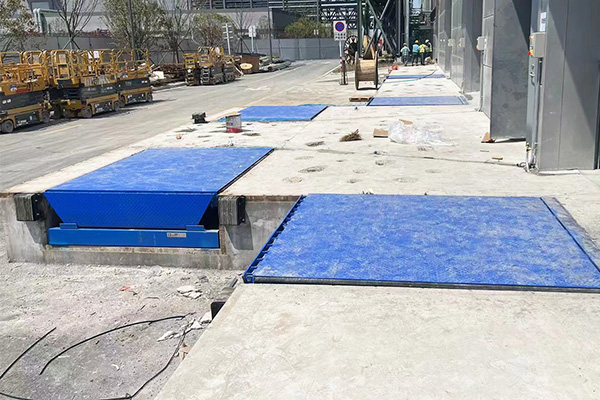
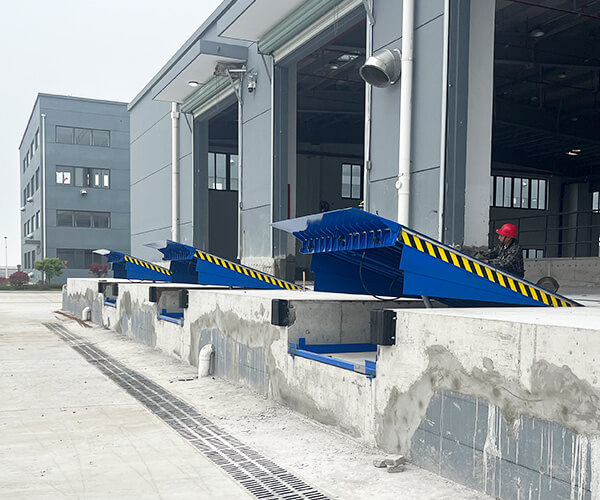
Pit-Style Levelers
These are the industry standard for high-volume loading docks. They are recessed into the warehouse floor, allowing for a wide range of upward and downward movement to accommodate various trailer heights. Installation typically follows one of two methods:
- Pre-Formed Pit: The concrete pit is constructed first using wooden forms, and the leveler is installed later. This is common for replacement projects or when the leveler delivery is delayed.
- Pour-in-Place: The dock leveler is placed onto the raw ground, and concrete is poured around it. The leveler itself acts as the form. This method is faster and ensures a perfect fit, making it popular for new construction.
Edge-of-Dock (EOD) Levelers
EOD units are bolted or welded directly to the face of the loading dock, eliminating the need for a concrete pit.
- Best For: Retrofit projects, facilities with limited floor space, or fleets where trailer bed heights are consistent (little variation).
- Trade-off: While dock leveler installation costs are significantly lower for EODs, they offer a very limited service range (typically only 5 inches above or below dock height).
Comparison: Pit-Style vs. Edge-of-Dock (EOD)
| Key Point | Pit-Style Leveler | Edge-of-Dock (EOD) |
| Cost | High | Low |
| Install | Complex (Requires Pit) | Simple (Bolt/Weld on) |
| Capacity | High (25k–80k+ lbs) | Low (20k–30k lbs) |
| Range | Wide (+/- 12″ to 18″) | Narrow (+/- 5″) |
| Space | Uses Warehouse Floor | Mounts to Dock Face |
| Safety | High (Less Gradient) | Med (Steep Slope Risk) |
| Lifespan | Long (Heavy Duty) | Moderate (Med Duty) |
| Maint. | Avg (Pit Cleaning) | Low (Easy Access) |
| Ideal Use | High Volume / Heavy | Low Volume / Retrofit |
Hydraulic vs. Mechanical Dock Levelers
The drive system you choose impacts both the complexity of the installation and the safety of your daily operations.
Mechanical Dock Levelers: These units rely on a system of springs and hold-downs.
- Installation: Simplest to install, because they require no electrical wiring or control boxes.
- Operation: entirely manual; operators must pull a chain to deploy the deck.
Hydraulic Dock Levelers: These use cylinders and fluid to move the deck and lip.
- Installation: Most complex; requires professional electrical hookups for the motor pump and heavy-duty voltage (often 3-phase).
- Why It’s Trending: Despite the higher initial setup, hydraulic dock leveler installation is increasingly preferred for high-traffic facilities. The push-button operation eliminates the physical strain on workers and the system has fewer mechanical wear points, resulting in lower long-term maintenance costs compared to spring-based systems.
Comparison: Hydraulic vs. Mechanical Levelers
| Parameter | Hydraulic | Mechanical |
| Buy Price | High | Low |
| Install | Complex | Simple |
| Maint. | Low | High |
| Lifespan | Long (10y+) | Avg (5-7y) |
| Operation | PushButton | Manual/Pull |
| Safety | Excellent | Basic/Low |
| Puissance | Required | None |
| Ergonomics | Best | Poor |
| Repairs | Rare/Exp | Frequent |
| Capacity | Very High | High |
Factors Influencing Your Choice
- Load Capacity (Dynamic vs. Static)
- Frequency of Use
- Vehicle Types and Height Variation
- Operational Environment
- Budget: Upfront vs. Long-Term (TCO)
- Safety Performance
The Pre-Installation Safety & Site Checklist
Measuring the Dock Area
Precision is non-negotiable. A variance of just half an inch can prevent a leveler from fitting.
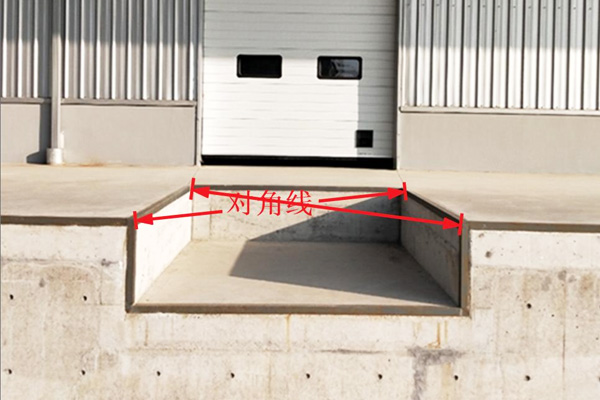
- Verify Pit Dimensions: Measure the width (curb angle to curb angle) and length (rear wall to front edge) at three different points.
- The Diagonal Check: Measure from the back-left corner to the front-right corner, then back-right to front-left. Crucial: These two numbers must be equal. If they differ, your pit is not square, and the leveler may bind during operation.
- Check for Slope: Standard pits pitch approximately ½ inch from rear to front for drainage. Confirm your replacement unit is designed to accommodate this “rear rake.”
Checking Structural Integrity
Your dock leveler is only as strong as the concrete holding it.
- Inspect Curb Angles: The embedded steel angles at the pit edges must be securely anchored into the concrete. Look for rusted-out sections or loose anchors that need re-welding before installation.
- Concrete Condition: Check the pit floor for major cracks or “honeycombing.” The floor must support the dynamic load (e.g., a 40,000 lb forklift slamming onto the deck), not just the static weight of the leveler.
- Obstruction Sweep: Identify and relocate any conduit pipes, bumper mounting bolts, or door tracks that intrude into the pit space.
Power Requirements for Hydraulic Units
- Voltage Matching: Do not guess. Check the motor data plate on the new unit against your facility’s supply.
- Common Single Phase: 115V or 230V
- Common Three Phase: 208V, 460V, or 575V (Preferred for high-efficiency motors).
- Disconnect Proximity: A fused disconnect switch must be installed within sight of the leveler (typically within 50 feet) to comply with Lock-Out/Tag-Out (LOTO) safety rules.
- Conduit Routing: Ensure electrical conduit enters the pit through the rear wall (not the floor) to prevent water damage and crushing risks.
Safety Perimeter & Fall Protection
- External Warning: Place “Stop – Men Working” signage and cones in the driveway to prevent trucks from backing into the bay during work.
- Internal Barriers: Erect high-visibility safety tape or portable guardrails to keep warehouse traffic at least 10 feet away from the open pit.
- Drop-Off Compliance: If the dock door must remain open for ventilation during prep, install a temporary safety net or guardrail to meet OSHA 1910.28 fall protection standards (required for drops > 4 feet).
Step-by-Step Dock Leveler Installation Guide
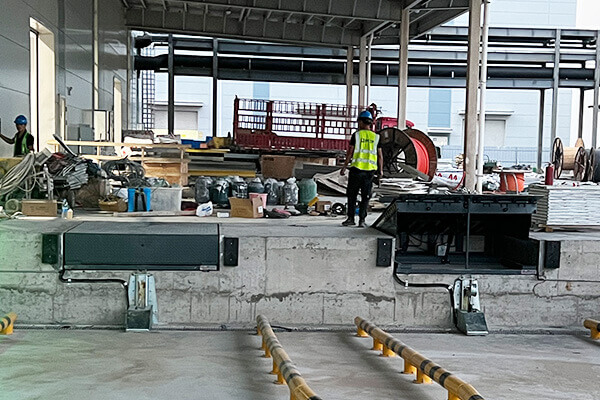
Step 1: Pit Preparation
Before the heavy lifting begins, the foundation must be flawless to prevent structural failure.
- Clean and Clear: Remove all debris, trash, and standing water from the pit. A clean surface is essential for proper shim adhesion and welding.
- Verify Embeds: Inspect the steel curb angles embedded in the concrete. They must be plumb, square, and securely anchored. If the steel is rusted or loose, it must be repaired before installation proceeds.
- Conduit Check: For hydraulic units, confirm the electrical conduit pipes are routed correctly through the rear pit wall and clear of obstructions.
Step 2: Positioning the Dock Leveler
Placement requires precision handling using heavy-duty equipment.
- Rigging: Insert lifting bolts into the manufacturer-designated lifting holes (usually in the side plates or deck). Attach chains or high-capacity straps to a forklift or crane.
- The Lift: Carefully lower the unit into the pit.
- Critical Alignment: Position the leveler against the rear pit curb angle.
- Gap Management: Most manufacturers require a specific gap (typically 1 inch) between the rear of the leveler and the rear pit wall to allow the hinge to function without binding.
- Safety Warning: Never allow personnel to stand inside the pit or under the leveler during the lifting process.
Step 3: Shimming and Leveling
- Shim Placement: Insert steel shims under the rear vertical uprights and the front maintenance strut/support legs.
- Goal: The shims must transfer the load directly to the pit floor.
- Flush Alignment: Adjust the shim stack height until the top of the dock leveler deck is perfectly flush with the warehouse floor. Use a 4-foot carpenter’s level to verify it is level from side-to-side and front-to-back.
- Tack Welding Shims: Once leveled, tack weld the shim stacks together and to the leveler frame to prevent them from vibrating loose during operation.
Step 4: Welding Securely
Welding permanently integrates the leveler into the building’s infrastructure.
- Rear Hinge Welding: This is the primary anchor point. Perform a continuous structural weld along the rear angle where the leveler frame meets the pit steel.
- Note: Ensure the rear hinge creates a seal to prevent debris from entering the pit.
- Front Curb Welding: Weld the front frame angles to the front pit curb steel.
- Method: Use a “skip weld” or “stitch weld” pattern (e.g., 2 inches of weld every 9 inches) to avoid overheating and warping the steel.
- Quality Control: Inspect all welds for penetration and slag. Apply a zinc-rich primer (cold galvanizing spray) to all welded areas to prevent rust.
Step 5: Wiring and Electrical Hookup
- Lock-Out/Tag-Out (LOTO): Ensure all power sources are turned off and locked out before stripping any wires.
- Routing: Run the wiring from the motor (under the deck) through the rear conduit to the wall-mounted control box.
- Connections: Connect the motor and solenoid wires to the control panel terminals according to the wiring diagram.
- Interlocks: If installing vehicle restraints or overhead doors, wire the safety interlocks now to ensure the leveler cannot operate unless the door is open and the truck is secured.
- Test Cycle: Restore power and perform a test cycle. Verify the lip extends fully and the unit returns to the cross-traffic (stored) position automatically.
Cost Factors: Budgeting for Your Project
Material vs. Labor Costs
| Dock Leveler Type | Material Cost (Unit) | Est. Install Labor | Total Initial Investment |
| Edge-of-Dock (Mech) | $1,500 – $3,000 | $500 – $800 | $2,000 – $3,800 |
| Pit-Style (Mechanical) | $3,500 – $6,000 | $600 – $1,200 | $4,100 – $7,200 |
| Pit-Style (Hydraulic) | $5,000 – $12,000 | $800 – $1,500 | $5,800 – $13,500 |
Hidden Costs to Consider
- Freight & Shipping: These units weigh 1,000–3,000 lbs. Shipping can easily add $500 – $1,000 depending on your distance from the manufacturer.
- Electrical Upgrades: Hydraulic units need power (often 3-phase). If your dock wall doesn’t have a disconnect box nearby, hiring an electrician to run conduit can cost $500 – $1,500.
- Concrete Curb Repair: When removing an old leveler, installers often find the steel curb angles (the pit edges) are rusted or broken. Re-welding and re-concreting this can add $300 – $1,000.
- Disposal Fees: Getting rid of 2,000 lbs of scrap steel isn’t free. Expect a $150 – $300 removal fee unless you have a scrap metal partner.
Total Cost of Ownership (TCO) Reality
- Mechanical Levelers: Lower upfront cost, but require spring adjustments and hold-down repairs every 3-5 years.
- Hydraulic Levelers: Higher upfront cost, but typically require only fluid checks and cleaning, often lasting 10+ years with minimal parts replacement.
Conclusion: Elevating Your Operations from the Ground Up
A loading dock leveler is the critical handshake between your inventory and the outside world. As we have explored, professional dock leveler installation is not merely a construction task—it is a strategic investment in the speed, safety, and longevity of your supply chain. The principles remain the same: precision planning prevents performance failure. Cutting corners on site preparation, electrical capacity, or installation quality doesn’t just risk equipment damage—it endangers the people who keep your business moving.
FAQs
What precautions should I take during hydraulic dock level installation?
Precaution begins with reading the instruction manual and following all safety warnings. Isolate power and hydraulic lines before working, use proper lifting equipment to avoid equipment damage, and ensure adequate shimming the leveler if the pit is uneven. Wear PPE, verify the dimensions of the pit and the leveler’s operating range, and keep hands clear of articulation and hinge areas. Check bumpers and counterbalance systems for proper adjustment, and perform step by step tests under low load before full use to reduce downtime and minimize risk to personnel and equipment.
Can I install a mechanical dock leveler manually or do I need special equipment to lift it?
Smaller mechanical dock levelers can sometimes be manually installed with several trained people using proper lifting techniques. Most require a lift or crane due to weight and to prevent equipment damage. Use pallet jacks only for positioning light components. For the full leveler assembly, equip the site with a lift rated for the load, and use rigging that secures the leveler in the vertical position while bolting it into the leveler pit. Always follow the instruction manual to maintain durability and correct articulation.
How do I ensure the leveler fits the leveler pit and meets specification?
Start by measuring the dimensions of the pit—length, width, depth, and lip recess—and comparing them to the leveler specification. Inspect the dock structure and confirm the type of dock and bumper locations. If measurements differ, adjust the pit or select a leveler designed for your measurements. During installation, shimming the leveler may be required to level the frame and set the leveler to the proper height to achieve correct articulation and safe float for pallet jacks and forklifts.
What are common causes of equipment damage during dock leveler installation and how can I prevent them?
Common causes include improper lifting, inadequate shimming, incorrect bolting, and failing to follow installation instruction, which can stress hinges, counterbalance systems, or hydraulic components. Prevent damage by using the correct lift, following step by step installation procedures, confirming pit dimensions and specification beforehand, torquing bolts to manufacturer values, and testing the unit through its full operating range before loading. Regular inspection of bumpers, welds, and articulation points reduces downtime and extends durability.
How do I install edge-of-dock levelers vs. levelers in the pit?
Edge-of-dock levelers mount on the face of the dock and generally require bolting to the deck plate and proper anchoring; they offer easier installation and less pit prep. A leveler in the pit requires excavation to the leveler pit dimensions, concrete finishing, and precise shimming so the leveler sits flush with the floor. For both types follow instruction and specification, verify counterbalance or hydraulic systems, and test with pallet jacks and forklifts to ensure safe loading and minimal downtime.
What maintenance and inspection steps should I perform after I install a dock leveler?
Inspect the dock and leveler monthly, checking for loose bolts, worn bumpers, hydraulic leaks, damaged articulation, and proper float and vertical position. Lubricate pivot points, verify counterbalance tension, and ensure the operating range still meets specification. Keep an eye on durability indicators like cracked welds or bent forks and immediately address any equipment damage. Routine inspection helps maintain efficiency and reduce downtime.
How do I adjust the leveler to the proper height and ensure smooth articulation for pallet jacks and forklifts?
Adjust height by shimming the leveler during installation and fine-tuning counterbalance or hydraulic settings per the instruction manual. Confirm the lip rests flush on the trailer and that the articulation allows smooth float without excessive vertical movement. Test with pallet jacks and forklifts under controlled conditions; if the leveler binds, inspect for incorrect shimming, debris in the pit, or improper bolt torque. Proper measurement and adjustment preserve operating range, increase efficiency, and improve long-term durability.