月〜土:午前9時〜午後7時 日曜日は休業

目次
- 1 はじめに
- 2 設置計画:ドックレベラーの選定について
- 3 設置前の安全・サイトチェックリスト
- 4 ドックレベラー設置手順のステップバイステップガイド
- 5 コスト要因:プロジェクトの予算計画
- 6 結論:基本から業務を向上させる
- 7 よくある質問
- 8 レベラーがレベラーピットに適合し、仕様を満たしていることを確認するにはどうすればよいですか?
- 9 ドックレベラー設置中に機器が損傷する一般的な原因と、その防止方法は何ですか?
- 10 エッジ・オブ・ドックレベラーとピット内レベラーはどのように設置が異なりますか?
- 11 ドックレベラー設置後に行うべき保守・点検手順は何ですか?
- 12 パレットジャッキやフォークリフトに対応するため、レベラーを適切な高さに調整し、スムーズな可動を確保するにはどうすればよいですか?
はじめに
現代の物流・倉庫業務において、ドックレベラーは内部保管と外部輸送を結ぶ重要な接点として機能します。トラックと倉庫の間には、隙間や高低差が避けられません。このギャップを安全かつ効率的に埋める方法は、積み込み速度、貨物の完全性、業務の継続性に直接影響します。本ガイドでは、 ドックレベラー設置工事, のコスト考慮事項、タイプ比較、主要な安全プロトコルに焦点を当て、施設の生産性を向上させるための情報に基づいた投資判断を支援します。.
適切なドックレベラーの設置は、単に鋼材をコンクリートに取り付けるだけではありません。フォークリフトを保護し、作業員の安全を確保し、輸送から保管までの商品の流れを円滑にします。しかし、計画の不備や施設の特定ニーズの誤判断は、構造的損傷、機器故障、業務の高額な中断を引き起こす可能性があります。.

設置計画:ドックレベラーの選定について
正しい機器の選定は、着工前の最も重要なステップです。ピット式とエッジ・オブ・ドックユニットの選択はインフラ要件を左右し、駆動方式(油圧式か機械式)は長期的な保守と電気要件を決定します。.
ピット式 vs エッジ・オブ・ドック(EOD)式レベラー
ピット式レベラー
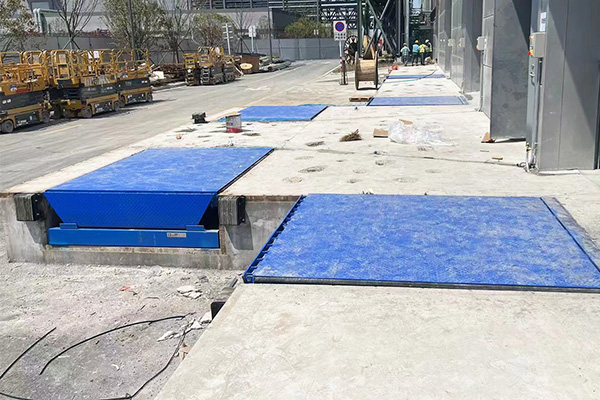
これらは高稼働ドックの業界標準です。倉庫床に埋め込まれ、上下に広い可動範囲を持ち、様々なトレーラー高さに対応します。設置は通常、以下の2つの方法のいずれかに従います。
- プレフォームドピット(事前成型ピット): 木製型枠を使用してコンクリートピットを先に構築し、後でレベラーを設置します。これは交換プロジェクトやレベラーの納入が遅れた場合によく用いられます。.
- プア・イン・プレイス(現場打設): ドックレベラーを素地の上に置き、その周囲にコンクリートを流し込みます。レベラー自体が型枠の役割を果たします。この方法は迅速で完璧な適合が保証されるため、新築工事で人気があります。.
エッジ・オブ・ドック(EOD)式レベラー
EODユニットは、ドックの前面にボルトまたは溶接で直接取り付けられ、コンクリートピットが不要です。.
- 最適な用途: 改修プロジェクト、床面積が限られた施設、またはトレーラー床高が一定(変動が少ない)の車両群に適しています。.
- トレードオフ: これらの特徴により、油圧式ドックレベラーは、特に倉庫や流通センターにおける過酷な用途に対して、信頼性が高く効率的なソリューションとなります。 ドックレベラー設置コスト はEODの方が大幅に低いものの、可動範囲は非常に限定的です(通常、ドック高さの上下5インチのみ)。.
比較:ピット式 vs エッジ・オブ・ドック(EOD)式
| 主要ポイント | ピット式レベラー | エッジ・オブ・ドック(EOD)式 |
| メンテナンス | 高 | 低 |
| 設置するのは | 複雑(ピットが必要) | 簡単(ボルト/溶接で取り付け) |
| 耐荷重 | 高(25,000~80,000ポンド以上) | 低(20,000~30,000ポンド) |
| 可動範囲 | 広い(上下12~18インチ) | 狭幅(+/- 5インチ) |
| スペース | 倉庫床面利用 | ドックフェース取付 |
| 安全性 | 高(勾配緩やか) | 中(急勾配リスク) |
| 寿命 | 長(重負荷用) | 中(中負荷用) |
| 保守. | 標準(ピット清掃要) | 低(アクセス容易) |
| 理想的使用条件 | 高頻度/重量物 | 低頻度/改修向け |
油圧式 vs 機械式ドックレベラー
駆動方式の選択は、設置の複雑さと日常作業の安全性の両方に影響します。.
機械式ドックレベラー: これらのユニットは、スプリングとホールドダウンのシステムに依存しています。.
- 設置:電気配線や制御ボックスが不要なため、最も設置が簡単です。.
- 操作:完全手動。オペレーターはチェーンを引いてデッキを展開する必要があります。.
H油圧式ドックレベラー: これらはシリンダーと流体を使用してデッキとリップを動かします。.
- 設置:最も複雑。モーターポンプ用の専門的な電気配線と高電圧(しばしば3相)が必要です。.
- トレンドの理由:初期設置コストは高いものの、, 油圧式ドックレベラーの設置は、 高頻度使用施設でますます好まれています。プッシュボタン操作により作業員の身体的負担がなく、機械的摩耗点も少ないため、スプリング式システムと比較して長期的な保守コストが低減されます。.
比較:油圧式 vs 機械式レベラー
| パラメータ | 油圧式 | 機械式 |
| 購入価格 | 高 | 低 |
| 設置するのは | 複雑 | 簡易 |
| 保守. | 低 | 高 |
| 寿命 | 長(10年以上) | 標準(5~7年) |
| 操作 | プッシュボタン | 手動/チェーン引き |
| 安全性 | 優良 | 基本/低 |
| 電源 | 必要 | 不要 |
| 人間工学 | 最良 | 劣る |
| 修理 | 稀/高額 | 頻繁 |
| 耐荷重 | 非常に高い | 高 |
選定に影響する要因
- 積載能力(動的 vs 静的)
- 使用頻度
- 車両タイプと高さ変動
- 運用環境
- 予算:初期費用 vs 長期的総所有コスト(TCO)
- 安全性能
設置前の安全・サイトチェックリスト
ドックエリアの測定
精度は絶対条件です。わずか半インチの誤差でもレベラーが適合しなくなる可能性があります。.
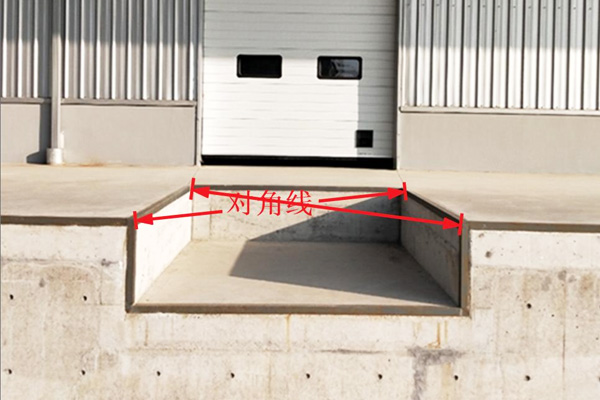
- ピット寸法の確認: 幅(カーブアングル間)と長さ(後壁から前縁まで)を3か所の異なるポイントで測定します。.
- 対角線チェック: 左奥隅から右手前隅、次に右奥隅から左手前隅までの距離を測定します。. 重要: これら2つの数値は一致しなければなりません。異なる場合、ピットが直角でなく、レベラーが作動中に固着する可能性があります。.
- 勾配の確認: 標準的なピットは約 1/2インチの勾配があります。 後方から前方への排水勾配を確認してください。交換ユニットがこの「後方傾斜」に対応する設計であることを確認します。“
構造的健全性の確認
ドックレベラーの強度は、それを支えるコンクリートに依存します。.
- カーブアングルの点検: ピット縁に埋め込まれた鋼製アングルは、コンクリートにしっかりと固定されている必要があります。設置前に、錆びた部分や緩んだアンカーがないか確認し、再溶接が必要な箇所を特定します。.
- コンクリートの状態: ピット床に大きなひび割れや「ハニカム状」の劣化がないか確認します。床は、 動的荷重 (例:40,000ポンドのフォークリフトがデッキに激しく乗り上げる場合)を支える必要があり、レベラーの静的重量だけではありません。.
- 障害物の確認: ピットスペースに侵入するコンジットパイプ、バンパー取付ボルト、またはドアレールを特定し、移設すること。.
油圧ユニットの電源要件
- 電圧整合: 推測は行わないこと。新しいユニットのモーター定格銘板を、貴施設の電源供給と照合すること。.
- 一般的な単相:115V または 230V
- 一般的な三相:208V、460V、または 575V(高効率モーターに推奨).
- ディスコネクトの近接設置: ヒューズ付きディスコネクトスイッチは、レベラーから見える位置(通常50フィート以内)に設置し、以下の要件を遵守すること。 ロックアウト/タグアウト(LOTO) 安全規則。.
- コンジット配線経路: 電気コンジットは、水害や破損リスクを防ぐため、後壁(床面ではない)からピット内に進入させること。.
安全周辺区域と転落防止対策
- 外部警告: 作業中は、トラックが作業中にバースにバックで進入するのを防ぐため、車道に「停止 – 作業員作業中」の標識とコーンを設置すること。.
- 内部バリア: 倉庫内の通行を開口ピットから少なくとも10フィート離すため、高視認性の安全テープまたは可搬式ガードレールを設置すること。.
- 段差対策の遵守: 準備中に換気のためドックドアを開放しておく必要がある場合は、OSHA 1910.28の墜落防止基準(4フィート超の段差に適用)を満たすため、仮設の安全ネットまたはガードレールを設置すること。.
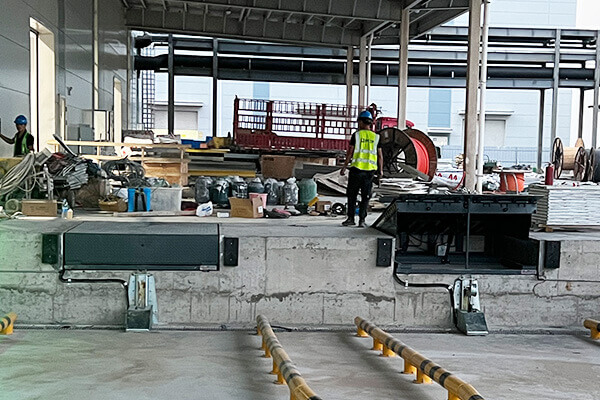
ドックレベラー設置手順のステップバイステップガイド
ステップ1:ピットの準備
重量物の吊り上げを開始する前に、構造的な破損を防ぐため、基礎は完全な状態でなければならない。.
- 清掃と障害物除去: ピット内のすべての瓦礫、ゴミ、溜まり水を除去すること。シムの接着と溶接を適切に行うためには、清潔な表面が不可欠である。.
- 埋込金物の確認: コンクリートに埋め込まれた鋼製カーブアングルを点検すること。これらは鉛直で、直角に配置され、確実に固定されていなければならない。鋼材が錆びているか緩んでいる場合は、設置作業を開始する前に修理を行うこと。.
- コンジット確認: 油圧ユニットの場合、電気コンジットパイプがピット後壁を通って正しく配管され、障害物がないことを確認すること。.
ステップ2:ドックレベラーの位置決め
設置には、重量物取扱い設備を用いた精密な取り扱いが必要である。.
- 吊り込み準備: メーカー指定の吊り穴(通常、側板またはデッキにある)に吊りボルトを挿入すること。フォークリフトまたはクレーンにチェーンまたは高強度スリングを取り付けること。.
- 吊り上げ: ユニットを慎重にピット内に降ろすこと。.
- 重要な位置合わせ:レベラーを ピット後壁のカーブアングルに合わせて配置すること。.
- 隙間管理:ほとんどのメーカーは、ヒンジが干渉なく機能するよう、レベラー後部とピット後壁の間に特定の隙間(通常1インチ)を要求する。.
- 安全警告: 吊り上げ作業中は、決して要員をピット内またはレベラーの下に立たせてはならない。.
ステップ3:シム調整と水平出し
- シム配置: 後部垂直支柱と前部メンテナンスストラット/サポート脚の下に鋼製シムを挿入すること。.
- 目的:シムは荷重を直接ピット床面に伝達しなければならない。.
- 面一調整: ドックレベラーデッキの上面が倉庫床面と完全に面一になるまで、シムの高さを調整すること。4フィートの水準器を使用し、左右および前後方向に水平であることを確認すること。.
- シムの仮溶接: 水平調整後、シムスタック同士およびレベラーフレームに仮溶接を施し、運転中の振動による緩みを防止すること。.
ステップ4:確実な溶接
溶接により、レベラーは建物のインフラストラクチャーに恒久的に統合される。.
- 後部ヒンジ溶接: これは主要なアンカーポイントである。レベラーフレームがピット鋼材と接する後部アングルに沿って、連続した構造用溶接を施すこと。.
- 注記:後部ヒンジが密閉状態を作り出し、ゴミがピット内に侵入するのを防ぐことを確認すること。.
- 前部カーブ溶接: 前部フレームアングルを前部ピットカーブ鋼材に溶接すること。.
- 方法:鋼材の過熱と反りを避けるため、「スキップ溶接」または「ステッチ溶接」パターン(例:9インチごとに2インチの溶接)を使用すること。.
- 品質管理: すべての溶接部について、溶け込みとスラグの有無を検査すること。防錆のため、すべての溶接箇所に亜鉛リッチプライマー(冷間亜鉛メッキスプレー)を塗布すること。.
ステップ5:配線と電気接続
- ロックアウト/タグアウト(LOTO): 配線の被覆剥きを行う前に、すべての電源が遮断され、ロックアウトされていることを確認すること。.
- 配線経路: モーター(デッキ下)から後部コンジットを通り、壁面設置の制御ボックスまで配線を配線すること。.
- 接続: 配線図に従い、モーターおよびソレノイドの配線を制御盤の端子に接続すること。.
- インターロック:設置する場合 車両拘束装置 またはオーバーヘッドドアの場合は、ドアが開きトラックが固定されていない限りレベラーが作動しないよう、安全インターロックを今のうちに配線すること。.
- テストサイクル: 電源を復旧し、テストサイクルを実施すること。リップが完全に延長され、ユニットが自動的にクロストラフィック(格納)位置に戻ることを確認すること。.
コスト要因:プロジェクトの予算計画
材料費 vs 人件費
| ドックレベラーの種類 | 材料費(1台あたり) | 設置労務費(推定) | 初期投資総額 |
| ドックエッジ式(機械式) | $1,500 – $3,000 | $500 – $800 | $2,000 – $3,800 |
| ピット式(機械式) | $3,500 – $6,000 | $600 – $1,200 | $4,100 – $7,200 |
| ピット式(油圧式) | 5,000~12,000米ドル | $800 – $1,500 | $5,800 – $13,500 |
考慮すべき隠れコスト
- 貨物輸送費: これらのユニットの重量は1,000~3,000ポンドです。輸送費は、製造元からの距離に応じて $500 – $1,000 追加される場合があります。.
- 電気工事: 油圧ユニットには電源(多くの場合三相)が必要です。ドック壁の近くにディスコネクトボックスがない場合、電気配管工事を依頼すると $500 – $1,500.
- の費用がかかる可能性があります。 コンクリート縁石補修: 旧式レベラーを取り外す際、設置業者はスチール製の縁石アングル(ピット端部)が錆びていたり破損していることに気付くことがよくあります。これの再溶接とコンクリート補修には.
- $300 – $1,000 が追加費用として発生する可能性があります。 廃棄処分費用: 2,000ポンドの鉄くずを処分するのは無料ではありません。スクラップ金属の提携先がない限り、.
総保有コスト(TCO)の現実
- $150 – $300 の撤去費用が発生するものとお考えください。.
- 機械式レベラー: 初期費用は低いですが、3~5年ごとにスプリング調整とホールドダウン修理が必要です。.
C油圧式レベラー:
初期費用は高いですが、通常は作動油の点検と清掃のみで済み、部品交換を最小限に抑えながら10年以上の耐久性が期待できます。.
よくある質問
油圧ドックレベラー設置時にどのような注意事項を守るべきですか?
結論:業務の基盤からのレベルアップ.
機械式ドックレベラーを手動で設置できますか、それとも持ち上げるための特別な装置が必要ですか?
ドックレベラーは、在庫と外部環境との間の重要な接点です。これまで見てきたように、プロによるドックレベラーの設置は単なる建設作業ではなく、サプライチェーンの速度、安全性、寿命への戦略的投資です。原則は変わりません。精密な計画が性能不良を防ぎます。現場準備、電気容量、設置品質を軽視することは、機器の損傷リスクを招くだけでなく、業務を支える人々を危険にさらすことになります。.
レベラーがレベラーピットに適合し、仕様を満たしていることを確認するにはどうすればよいですか?
予防策は、取扱説明書を読み、すべての安全警告に従うことから始まります。作業前には電源と油圧ラインを遮断し、適切な吊り上げ装置を使用して機器の損傷を防ぎ、ピットが不均一な場合はレベラーに適切なシムを入れてください。保護具を着用し、ピットの寸法とレベラーの動作範囲を確認し、関節部やヒンジ部分に手を近づけないでください。バンパーとカウンターバランスシステムの調整が適切であることを確認し、本格使用前に低負荷での段階的テストを実施し、ダウンタイムを削減し、人員と機器へのリスクを最小限に抑えてください。.
ドックレベラー設置中に機器が損傷する一般的な原因と、その防止方法は何ですか?
小型の機械式ドックレベラーは、適切な吊り上げ技術を用いた訓練された複数の作業員によって手動で設置できる場合があります。重量と機器損傷防止のため、ほとんどの場合はリフトまたはクレーンが必要です。軽量部品の位置決めにはパレットジャッキのみを使用してください。レベラー全体の組み立てには、荷重定格に適合したリフトを現場に用意し、レベラーを垂直状態で固定しながらピットにボルトで取り付けるためのリギングを使用してください。耐久性と正しい関節動作を維持するため、必ず取扱説明書に従ってください。.
エッジ・オブ・ドックレベラーとピット内レベラーはどのように設置が異なりますか?
まず、ピットの寸法(長さ、幅、深さ、リップ凹部)を測定し、レベラーの仕様と比較してください。ドック構造を点検し、ドックの種類とバンパーの位置を確認してください。測定値が異なる場合は、ピットを調整するか、測定値に適合するように設計されたレベラーを選択してください。設置時には、フレームを水平にし、レベラーを適切な高さに設定して、パレットジャッキやフォークリフトに対して正しい関節動作と安全なフロートを実現するために、レベラーにシムを入れる必要がある場合があります。.
ドックレベラー設置後に行うべき保守・点検手順は何ですか?
一般的な原因としては、不適切な吊り上げ、不十分なシム入れ、誤ったボルト締め、設置手順の不遵守が挙げられ、これらはヒンジ、カウンターバランスシステム、または油圧部品にストレスを与える可能性があります。損傷を防ぐには、適切なリフトを使用し、段階的な設置手順に従い、事前にピットの寸法と仕様を確認し、ボルトをメーカー指定のトルクで締め、積載前にユニットの全動作範囲をテストしてください。バンパー、溶接部、関節部の定期的な点検により、ダウンタイムを削減し、耐久性を延ばすことができます。.
パレットジャッキやフォークリフトに対応するため、レベラーを適切な高さに調整し、スムーズな可動を確保するにはどうすればよいですか?
ドックエッジ式レベラーはドックの前面に取り付けられ、通常はデッキプレートへのボルト固定と適切なアンカー固定が必要です。設置が容易で、ピット準備が少なくて済みます。ピット内レベラーは、レベラーピットの寸法に合わせた掘削、コンクリート仕上げ、およびレベラーが床と面一になるための精密なシム入れが必要です。両タイプとも、取扱説明書と仕様に従い、カウンターバランスまたは油圧システムを確認し、パレットジャッキとフォークリフトでテストして、安全な積載とダウンタイムの最小化を確保してください。.